
How to install a sliding gate motor?
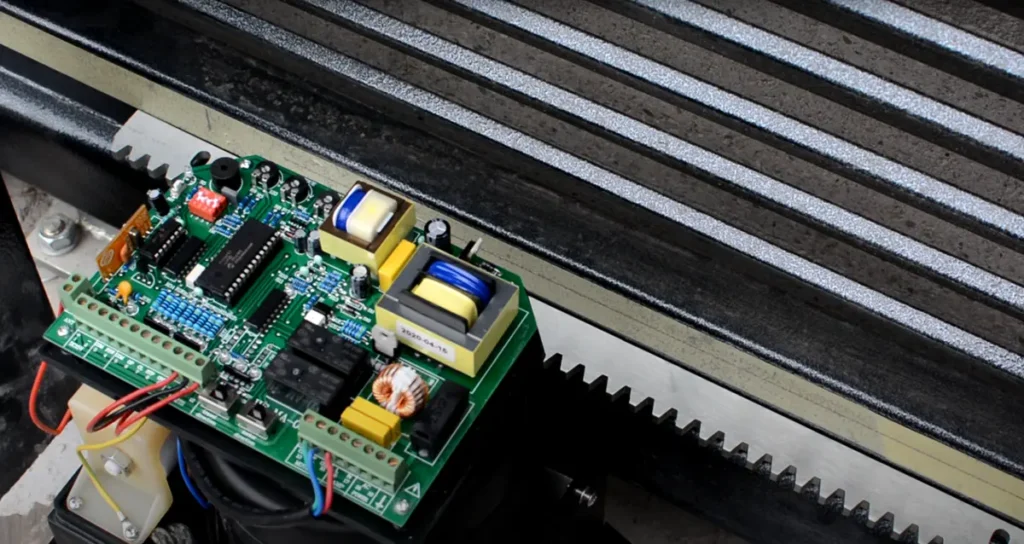
Table of Contents
- Introduction
- Preparation of electrical installation
- Foundation preparation
- Gear racks
- Mounting the drive on the foundation
- Drive height adjustment
- Electrical connection
- Commissioning and adjustment
- Summary
Introduction
Automated gates on properties are already standard. When building a new house or other facility, the installation of gate automation is rather planned immediately.
If we intend to commission it to a specialized company, we can have peace of mind 🙂 But if we want to carry out such a drive installation ourselves, it can be a bit scary. Completely unnecessarily, however!
In this article, I will briefly present the activities and rules governing the installation of a sliding gate automation, without focusing on a specific drive model. It will be a universal description that will work in any case.
Preparation of electrical installation
It is not without reason that I mention this first. All cables are best laid before pouring the foundation for the gate. When we know in advance where the drive will stand, we can immediately bring out a wiring harness in this place. This will save us unnecessary combinations and forging concrete in the future.
If the foundation already exists, we have no choice, but the cables must still be brought to the drive installation site one way or another. You should always bring the wires out with some excess length. It’s easier to cut a cable if it’s too long than to extend it if it turns out to be too short. Run cables in properly thick conduits or other pipes laid by the gate. Thanks to this, if the need arises in the future, you will easily be able to add additional wires by pulling them through the pipes.
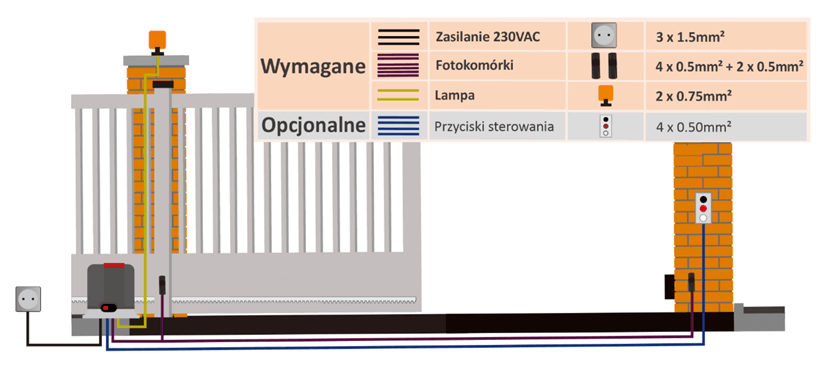
The layout of the wiring, the minimum number of cores and their cross-sections will always be detailed in the drive documentation, so first of all you should look there. If something important to you is missing, don’t combine on your own – contact the manufacturer asking for additional information.
Foundation preparation
If the foundation is just to be poured, its dimensions can be properly selected so that the automation can fit on it. If we install the drive by an already existing gate, sometimes it is necessary to enlarge the foundation appropriately, making an „addition”. You cannot mount the drive on concrete that is too fresh, so wait an appropriate amount of time after pouring it.
Measure at what height the gear racks will have to be installed on the gate. Take this into account when pouring the foundation, if you have the opportunity, raising the base for the drive accordingly. If the foundation already exists, an additional metal base for the automation will most likely be needed so that it is installed at the right height.
Usually, together with the drive, you receive a metal mounting plate with pre-drilled holes for screws. The spacing of these holes is the same as in the drive mounting brackets. It is worth using such a plate when pouring the foundation. Screw threaded pins into the holes in the plate and embed it in the foundation. Thanks to this, you will not have to drill holes in the concrete for the anchors mounting the drive, but you will screw it to the protruding pins.
Gear racks
Metal and plastic racks are available on the market. In any case, you should make sure that they are installed on the appropriate structural profile of the gate. Most often, the carriages move in its lower profile, so if you want to attach the racks to this profile, remember that nothing prevents the movement of the carriages.
Metal racks generally have punched holes for mountings, and the set includes spacer sleeves and fixing screws to the gate. Plastic racks usually have appropriate brackets prepared, which also create a distance from the gate profile.
Both in the case of metal and plastic racks, you must make sure that the method of their attachment does not prevent the movement of the gate. For this reason, it will most often not be possible to mount them on the lowest gate profile, in which the carriages are located. This will only be possible in the case of metal racks when the spacer sleeves are welded to the gate. But when you don’t want to weld, you’ll most likely use rivet nuts or thread the holes in the gate profile. Either way, the screws can enter the inside of the profile and block the movement of the carriages. Therefore, in this case, mount the racks on a higher profile and raise the drive appropriately (raising the foundation or an additional metal base).
After installing the racks, do not forget about the anti-corrosion protection of the gate. If metal racks are installed using welded sleeves, the gate can be handed over for galvanizing after welding them. But if this is not possible, a paint coating is the absolute minimum.
Mounting the drive on the foundation
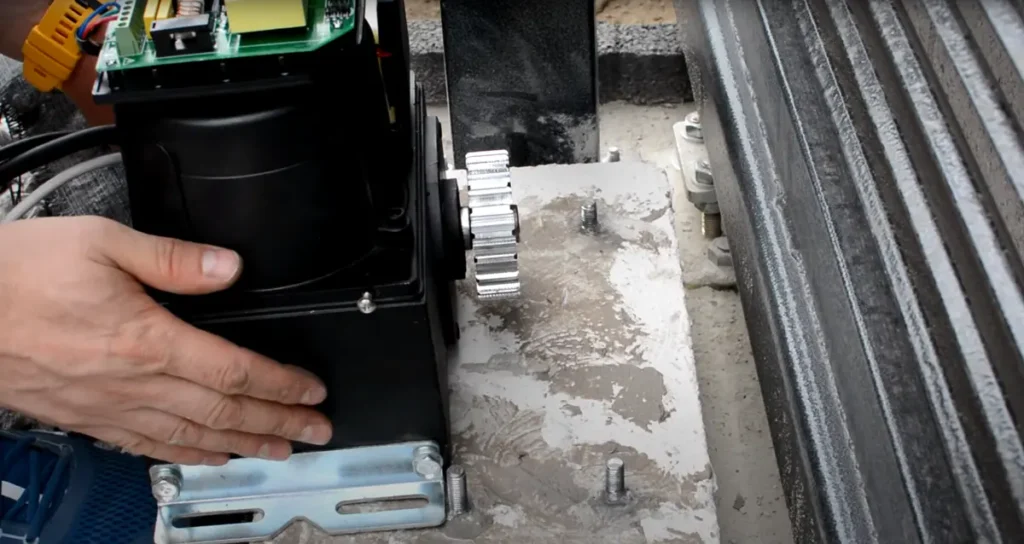
Fixing the drive to the foundation must be done solidly. If you embedded the mounting plate provided with the drive with screwed pins in the foundation, you just need to screw the drive to them.
But if you didn’t use such a plate, threaded pins embedded in concrete using a chemical anchor work very well. You can also use metal anchors or plastic expansion wall plugs.
Either way, first you need to mark the places for drilling holes in the concrete. Therefore, set the drive in its target place and trace the mounting holes. If the drive needs to be raised higher, we will most often use an additional metal base. In this case, first screw the drive to the base, and then place the whole thing on the concrete and trace the drilling points.
Then we drill holes using a rotary hammer and a drill bit with a diameter appropriate to the anchors or threaded pins used. We clean the holes of dust after drilling. Then you can embed the pins in the chemical anchor or pre-screw the drive with another selected method. If we act on chemistry, of course, you have to give time for the anchor to set – you will always find information on this subject in the product instructions.
Drive height adjustment
The drive must be mounted in such a way that there is a clearance of about 2 mm between the gear racks and the drive gear. The mounting holes of the racks give some small adjustment range, but it will not always be sufficient.
Sometimes it will be necessary to adjust the drive height to some extent. There may be a situation where you need to raise it a bit, but not enough to use an adjustable metal base.
In this case, check the drive manual for the maximum height it can be raised on the pins themselves fixed in the concrete. If how much we need to lift it does not exceed the permissible range, we can go ahead and do it on the pins themselves. It is enough then to use additional nuts with which this drive can be lifted. Otherwise, to maintain adequate mounting stiffness, it will be necessary to „pour” concrete to the appropriate height, or create the appropriate distance in another way. Raising the machine by several centimeters on the pins is definitely a bad practice! Then the drive will „swing” every time it starts and stops, which will lead to the breaking of the mounting pins.
Electrical connection
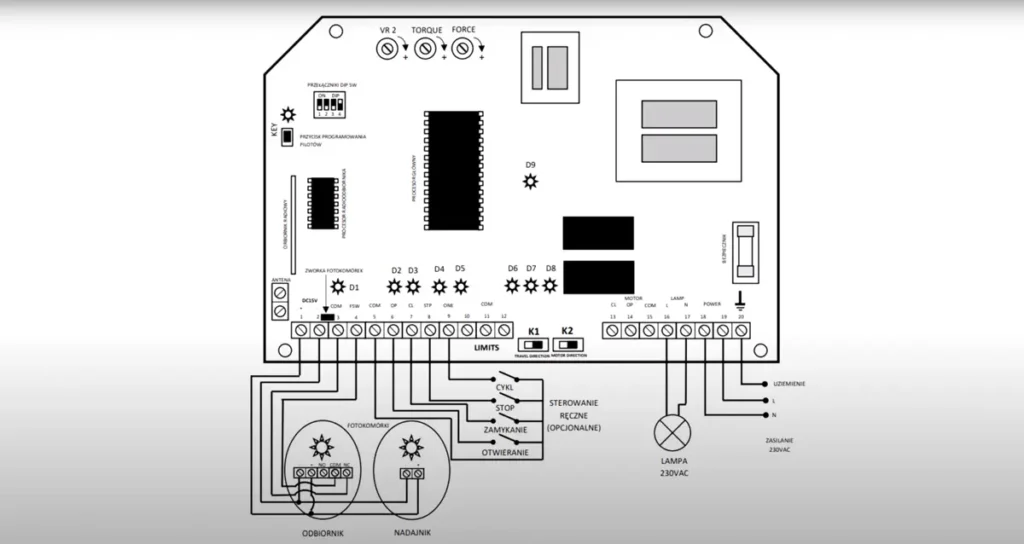
When the drive is already in place and adjusted to the gate and gear racks, you can connect the electrical system. The entire connection diagram is always found in the manual.
When connecting wires, take special care to avoid short circuits and equipment damage. Always check everything 2x! And never do it with the voltage turned on – especially on the 230V power cord!
Be sure to secure the cable gland in the drive casing. The point is to prevent insects and rodents from entering the drive – especially in winter. This is often the cause of electronics damage, and you want to avoid that.
Commissioning and adjustment
Before turning on the supply voltage, check all connections again. When you are sure that there are no short circuits anywhere, you can turn on the voltage.
Adjusting the drive operating parameters will most often require adjusting the overload sensitivity, setting the end positions and checking the correct operation of the photocells. If any additional activities are required, appropriate information will certainly be found in the manual.
Do not underestimate safety issues and devote as much time as necessary to regulation. Carefully check the operation of the photocells and the overload system. This can really be a matter of life and death!
How to install a sliding gate motor – summary
Installing a sliding gate motor is not complicated and you can easily handle it yourself. The whole operation will be successful as long as you remember these simple rules that I have listed. And always read the manual included by the manufacturer! This way you will avoid unnecessary problems, and the equipment will serve you for many years.


